
I’ve been inducted into the super hardcore group the Daring Bakers. Lemme tell ya, cooking and blogging…never would have thunk it. Shall I call it ..clogging or blooking? I enjoy words and writing and I immerse myself in cooking. Imagine my surprise when I realized this world of internet cook clubbing on the web! And here I am part of Daring Bakers with my first challenge!
The March 2009 challenge is hosted by Mary of Beans and Caviar, Melinda of Melbourne Larder and Enza of Io Da Grande. They have chosen Lasagne of Emilia-Romagna from The Splendid Table by Lynne Rossetto Kasper as the challenge.
The first time I handmade pasta was two summers ago when I made ravioli. Not painstaking but incredibly time-consuming and arm-tiring. Nonetheless, I was up to the challenge of making spinach pasta.
I mounded my flour, made the well and added my spinach and eggs. I found that I had to add 4 eggs to my mixture (large, not jumbo) before it started to come together. The entire kneading process was not too laborious, granted I felt it in my triceps the next day. Neither was the rolling part. I managed to get about 16 pieces. What was annoying however was the drying process, something I had no control over!
I should have followed a fellow DB who suggested laying the pasta flat to dry, which not only prevents shrinking but GRAVITY! Perhaps I let my pasta dry too long (overnight) but when I woke up the next morning there were some pieces on the floor that broke off while hanging! I WAS NOT A HAPPY BAKER!
Well that changed my mood throughout the rest of the process. My béchamel sauce was divine. Nutmeg is amazing! But here I was with this great white sauce and pieces of lasagne to assemble it with! With regards to the sauce, next time I will made more as the sauce really thickened towards the end of assembly.
Realizing I could not serve the lasagne as a main entrée, I used it as a side dish to some zucchin squash and a broiled fish with a cilantro-based version of gremolata (yes, I know what you are thinking lasagne and fish??).
All in all, the spinach pasta was delicious. Any alternative to just plain white flour-based pasta appeals to me. The béchamel was a nice substitute to just a ragu. Next time, I would add some veggies and or meat in between the layers.
Bottom Line: A little disappointed in the outcome of my first DB challenge. I think I’d rather buy my own pasta, make my own white sauce and maybe add some goat cheese or feta. I’m determined for the next challenge, however. Bring it on!
Sunday, March 29, 2009
Daring Bakers- Lasagne of Emilia-Romagna
Sunday, March 22, 2009

I have to say I was a bit surprised when I my cousin called me last week and asked if I would make a cake for her daughter’s birthday. Not just any cake, a Mickey-themed cake. Always one up for a challenge (and an inability to say no), I decided to give it a shot.
My first decision was how to represent Mickey. Do I do a sheet cake with a picture of MM? Do I do a cake and buy some MM toys? The obvious was to do a MM shaped cake, but it daunted me a little. Yet in the end, I decided to go for it.
I didn’t want to buy a MM cake mold pan but wanted to do his face. Surfing the internet, I decided upon doing MM’s face using three cakes. I used two 6-inch cakes as MMS ears and one 8-inch cake as his face. Each cake was 2-layers thick. For the icing I used a cream cheese frosting. Fitting, isn’t it? The mouse cake with cheese frosting J I opted against black icing for a few reasons : 1. It stains your teeth and 2. Since I was using so much black, it would get messy and gooey. Instead, I bought a package of Oreo cookies, scraped out the cream, and then food-processed the wafer part. NOTE/CAUTION: Feel free to use store brand cookies but it will not produce the blackness needed for MM.
I added the frosting in between the two layers and then coated the outside of cake in frosting, making sure the “ears” joined to the “face.”
I then looked at an image of MM that I wanted to use and free-handed the face with a toothpick. You could print out an image and trace but I didn’t have the time to go searching and printing for one pick enough. I then added the cookie dust to the ears and the outline of the face, pupils and nose. I let the cake dry overnight.
For MM’s skin, you can either buy copper food coloring and add to white frosting or make your own. The store was out of copper so I was left playing with food coloring. I then attached the start tip to my icing bag and piped in MMs face using my skin tone frosting, red, white and darker brown I’d concocted.
Not only was I pleasantly surprised with the results but my cousin and the guests were as well, at least those who knew I’d made it.
BOTTOM LINE: TIME-CONSUMING! If you have the time and dedication, definitely possible. I would make these types of cakes again. Boy, are my children going to have the best cakes EVER!
You’ve heard of Carrot Cake, how about: Tomato Soup Cake


When I was younger, I refused to eat any cake or bread with vegetables in it. Carrot cake? Nope. Zucchini Break? I passed. Pumpkin Pie? Gross. However, I’ve slowly grown to include those on my “in” list. And now I ask you what about Tomato Soup Cake? Sounds kinda weird. But skeptical as I was, I made the cake…and it was actually delicious bite after bite. 
The cake smelled amazing with just a tiny hint of tomato. If anything the soup added to the moisture of the cake. There were also raisins and nuts in the cake. I topped it with a Cinnamon Buttercream which wasn’t too sweet with all that cake. If anything, it’s comparable to a Carrot Cake
The fun, quick part about making this cake is that you can definitely use shortcuts. In this instance, because I made a bunch of desserts in one night, I opted for the semi-homemade technique (shout out to Food Network’s Sandra Lee). To a box of yellow butter cake, I added my own spices: ground ginger, ground nutmeg, ground cinnamon, ground cloves and ground allspice. Now, you certainly can take the all-from-scratch route and make the spice cake or you can even go as far as to pick up a box of spice cake mix. Three levels of spice caking, your most convenient need only apply. Cinnamon buttercream is an easy-to-make as well. Just add cinnamon to your traditional buttercream recipe.
Bottom Line: I would make this cake again, but more as a wow factor. The spice part of the cake was heavenly. Loved the spices mixed in with the nuts and raisins.
1 stick Butter
3 cups of confectioners sugar
3 tablespoons of Milk
2 teaspoons of Ground Cinnamon
1 teaspoon of Vanilla
Directions
Place butter in mixing bowl and mix until fluffy. Add powdered sugar, add 3 tablespoon of milk and vanilla and butter flavoring and mix until fluffy. Then add the ground cinnamon and mix well. When the cake is completely cooled, frost the cake. Let set in the Fridge for 20 minutes before serving.
The Cheececakettes Spectacular (aka Mini Cheesecakes)

I am a sucker for Cheesecake, anything made with cream cheese for that matter. Smooth, rich, a little tangy, yummm. When Jess ( Chubb ), first told me about her cupcaking mission and I agreed to make them too, she showed me the list and allowed me to pick. As soon as I read the list, my eyes zoned in on this cheesecake recipe found in the February issue of Martha Stewart Living.
I’ve always been looking to make the perfect cheesecake. Although mini in stature, I came pretty close to that goal in these cakes. From watching Good Eatson FoodNetwork, I’d realized that I was baking my cheesecakes at too high a temperature which enabled cracks and a dryness to my cakes. Coupled with that knowledge I went forth to make these cupcakes.
Not one for apricot jam, I knew I would be using another kind. I saw mango jam at the store and thought to do an island-inspired cupcake. Rather than the wafer crust, I crushed coconut cookies. Then I baked the cheesecakes. One step I added in was cooking the cakes in a pan of hot water while instead of directly on oven rack. I think it increased the cooking time.
I chilled the cupcakes overnight and then again after spooning the liquefied jam in the center.The longer they chilled, the less soft/runny they were in. This cheesecake was very smooth, creamy and rich! The coconut crust added a nice flavor to the cake, as did the jam. However, I thought the jam a bit too sweet. Not only will I make these again, but also I will try it as a larger cake.
I thought the finished product resembled eggs that I posed them in the pine tree. Try balancing a cupcake on a branch while taking a picture!

Hey Mr. Tallyman, Tally Me Banana


What do you do when you have overripe bananas? My answer will always be banana bread. What about when you have 12 overripe bananas and 12 almost overripe bananas? Make LOTS of banana bread!
My mom’s friend said she had a few too many bananas and would my mom like some. Little did my mom know that she had said yes to maybe 40 bananas! For a few days, I felt as if the three of use were engaged in a banana-eating contest as we raced to eat them before they went bad. Potassium overload, anyone?
I finally told my parents to stop eating so quickly, let some ripen enough to make bread. Behold, the results. My favorite banana bread recipe, which involves lots of banana, walnuts and/or pecans, and oatmeal is quite easy to make put together and versatile. Not only are the nuts and oatmeal optional but you can also add in chocolate chips, raisins, cinnammon, etc. to you palatial liking.
The most time-consuming part of this recipe is waiting for it to bake which is about an hour in a loaf pan. The recipe also makes great muffin batter.
BOTTOM LINE: Like I said, this is my fave banana bread recipe and I'll continue making it.
Banana Nut Oatmeal Bread
INGREDIENTS
1/2 cup shortening
3/4 cup white sugar
2 eggs
1 cup mashed bananas
1 teaspoon vanilla extract
1 1/2 cups all-purpose flour
1/2 teaspoon baking soda
1/2 teaspoon salt
1/2 cup quick cooking oats
1/2 cup chopped walnuts
DIRECTIONS
Preheat oven to 350 degrees F (175 degrees C). Lightly grease a 9x5 inch loaf pan.
In a large bowl, cream together the shortening and sugar until light and fluffy. Stir in the eggs one at a time, beating well with each addition, then stir in the banana and vanilla.
In a separate bowl, sift together flour, baking soda and salt. Beat into creamed mixture. Stir in oats and nuts. Pour into prepared pan.
Bake in preheated oven for 50 to 55 minutes, or until a toothpick inserted into the center of the loaf comes out clean.
The Non Macaron
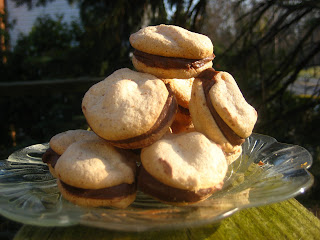
And now onto my mac(aron) attack. I first thought that I had foiled my first attempt because I’d forgotten to sift my almond-sugar mix as per the direction found in Desserts Mag. Completely disappointed with myself, I went ahead with baking and in decide to swirl the batter into the circles rather than just pipe circles. When I put them to bake, they looked great actually, except I had swirled the cookies…(hello again, hindsight). My first attempt had FEET! They boasted a nice, shiny shell while hitting you with the chewy inside, almost reminiscent of nougat, except with that nutty flavor. They were, quite frankly, delicious. Imagine how they would be if I HAD sifted. So, I saved my Ghiradelli choc. chips for the next time. I filled the first set with ice cream, jams, and some with a few melted chocolate chips. I even just popped a few in my mouth plain.
Ready for my second go and determined for success, I set out to make Macarons part deux. My egg whites were aged and my almonds super ground. And come this time, I did NOT forget to sift. And THAT was my problem. I remember now when I read in the Macaron Chronicles of Veronica’s Test Kitchen about how she griped about almond flour. Like the almond flour, I think my mixture was too fine. When it was added to the egg whites, it produced the chewy factor, but no feet and no shell. SAD DAY! I still filled my cookies with a chocolate ganache and they still tasted delicious. They just weren’t macarons. Rest assured, there will be a part three to this saga…the resurrection.
